Detection Results
Browse the live feed of AI detections — model, camera, label, confidence, bounding box, and latency — with filters and per-camera drill-down.
On this page
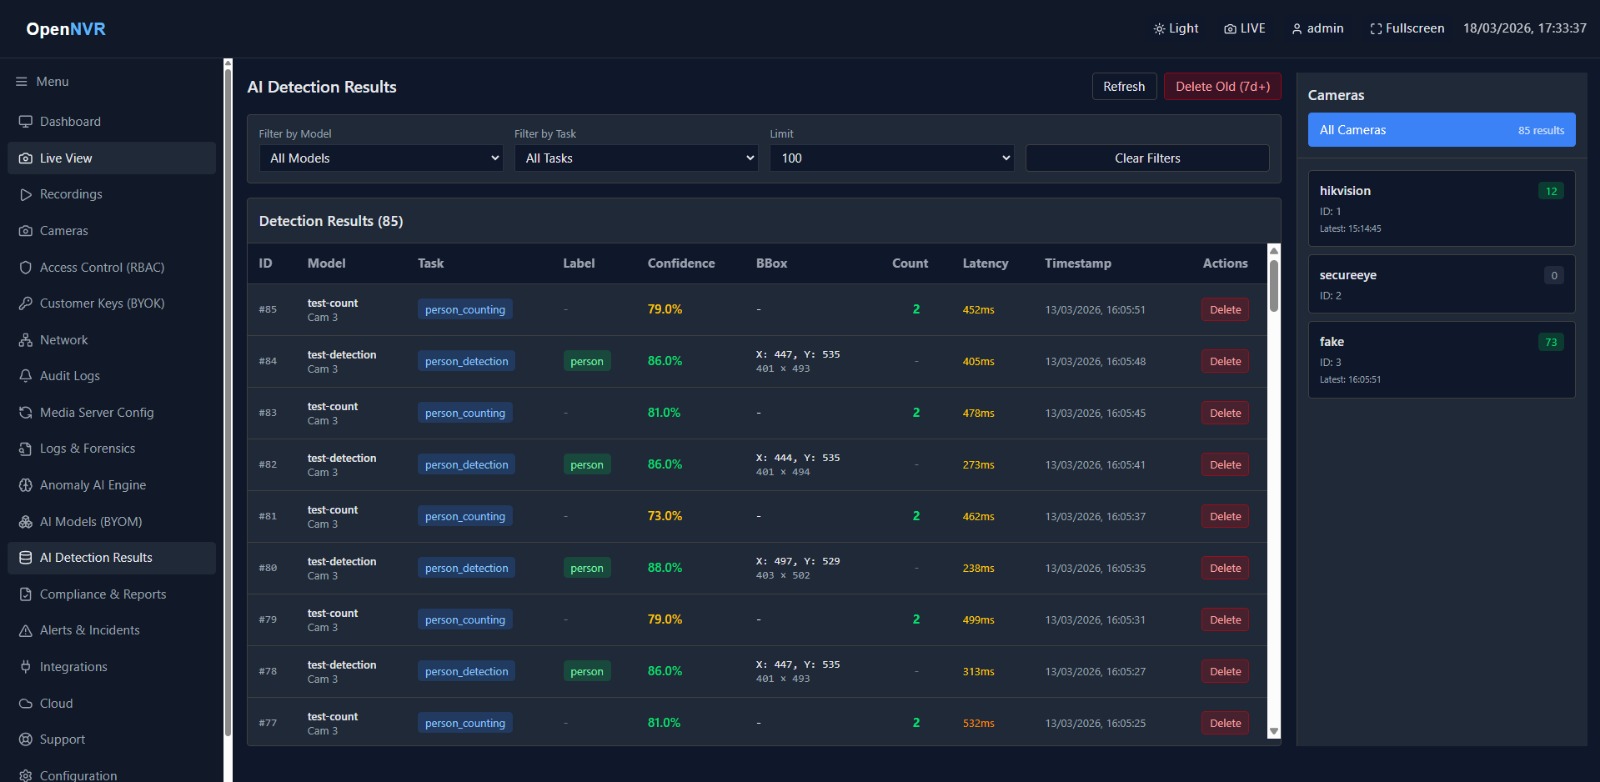
Detection Results is the read-only feed of everything your AI models have detected. You’ll find it under AI & Detections → Detection Results in the sidebar. It shows detections as they happen (pushed live over a WebSocket) plus recent history from the database.
[!NOTE] This tab is shown to users with the AI Models permission (
byom.manage). Anyone signed in can view results; the Delete and Delete Old actions are superuser-only.
What you can do here
- Watch detections stream in live — new rows appear the instant the backend produces them, with no polling.
- Filter by model, by task, and by result limit.
- Click a camera in the right-hand sidebar to focus on just that camera’s detections.
- Open a Camera Details dialog for per-camera statistics (total detections, models used, task types, average latency, recent detections).
- Refresh to reload history, and (superuser) delete individual results or bulk-delete old ones.
Read the results table
Each row shows one detection:
| Column | Shows |
|---|---|
| ID | Result id (#…); live-pushed rows use a temporary negative id until you Refresh |
| Model | Model name and the camera it came from (Cam …) |
| Task | The task that produced it (e.g. person_detection) |
| Label | Detected class, or a caption for scene-description results |
| Confidence | Percentage, color-coded (green ≥ 80%, yellow ≥ 60%, orange below) |
| BBox | Bounding box: X, Y and width × height |
| Count | Object count (e.g. for person counting) |
| Latency | Inference latency in ms, color-coded (green < 200, yellow < 500, orange above) |
| Timestamp | Local date/time of the detection |
| Actions | Delete (superuser only) |
[!NOTE] The table header counts the currently shown rows, e.g. Detection Results (100). Empty state reads “No detection results found. Run inference to generate results.” — start a model on AI Models (BYOM) to populate it.
Filter the feed
The filter bar sits above the table:
- Filter by Model — pick a specific model or All Models.
- Filter by Task — pick a task (options come from the tasks present in the current results) or All Tasks.
- Limit — cap the number of rows:
50,100,200, or500(default100). - Clear Filters resets model and task and returns the limit to
100.
Filters apply to both the loaded history and the live-pushed rows.
Focus on one camera
The right sidebar lists every camera with a badge showing how many results it has.
- Click All Cameras to see everything, or click a camera to filter to it.
- Clicking a camera also opens the Camera Details dialog, which shows:
- Camera info (name, id, IP:port, status, manufacturer, model, location, active).
- Detection statistics — Total Detections, Models Used, Task Types.
- Models & Tasks running on that camera, each with its detection count and average latency.
- Recent Detections — the last few for that camera.
- Click Close (or outside the dialog) to dismiss it.
Refresh and clean up
- Refresh (top-right) reloads history from the server. Events that arrive mid-refresh are buffered so live rows aren’t lost.
- Delete (per row, superuser only) removes a single result after confirmation.
- Delete Old (7d+) (superuser only) bulk-deletes results older than 7 days after confirmation.
📸 Screenshots to capture
The existing infeencing results.jpeg is reused for the overview. Optionally add:
detection-results-filters.png— the filter bar with a model and task selected.detection-results-camera-dialog.png— the Camera Details dialog open, showing the statistics tiles and Models & Tasks list.